Quick comparison of the Titans Return Brainstorm with his KO Kabaya Counterpart, since I have no G1 version to compare with... The Kabaya mold is quite similar to the G1 version... First, jet mode...
The headmasters...
Head on!!!! The Kabaya mold is fantastic, it even retains the chest tech-specs feature... and TR Brainstorm can now hold the 2 nosecone guns... nice...
Thursday, December 29, 2016
Wednesday, December 28, 2016
Titans Return Brainstorm - Removable Nosecone Guns Modification
Started the operation last night to modify the nosecone guns to be removable and used as hand guns for Titans Return Brainstorm in his robot mode... First, cut off the guns carefully, and trim and sand carefully to as nice as you can be... hahahaha...
I found a short piece of DIA 5mm hollow rubbery plastic pipe to cut into handles and they can fit nicely into the fist-holes, and used 2 Tamiya pins to secure the pipe pieces to the cut-off guns... Dia 5mm holes are drilled at the nosecone to plug in the guns in jet mode...
Joining is done using Alteco brand epoxy glue... Hope it stays... Then need to cover the ugly grey patches which is the plastic colour... This is the toughest part, as I don't have teal colour paint and only with certain paints, so I tried mixing around (poster colour with paint-pens, etc)... In the end got a near teal but not the same entirely and also quite badly mixed (hints of yellow appeared quite visibly after applying superglue as protective coating)... Looks quite bad in pictures but still barely acceptable to the physical eyes... anyway, they will be quite hidden and not really visible when posing the figure...
Done! Now TR Brainstorm can wield 2 guns!!!! Hahahahaha... Looks good...
The robot's back...
Jet mode without the guns plugged in... Top and front views are ok, but side views will reveal the 2 holes at the nosecone... ugly... hahahahaha....
Guns plugged in!!!
And with this TR Brainstorm, I finally completed the 4 original Autobot Headmasters (not counting in Fortress Maximus)... Happy...
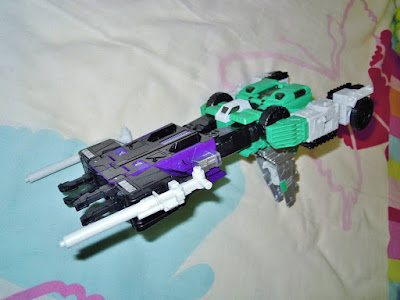
Titans Return Sixshot with G1 Counterpart
First, I admit I will not accept the so-called submarine mode for Titans Return Sixshot... And it is quite fun playing around to get different configurations for the gun mode... hahahaha...
The G1 gun mode looks bigger, but it seem to be a bit too big for comfort holding in hand... Titans Return version is much more comfortable to hold...
And the various modes of Sixshots...
The G1 gun mode looks bigger, but it seem to be a bit too big for comfort holding in hand... Titans Return version is much more comfortable to hold...
And the various modes of Sixshots...
Monday, December 19, 2016
Restoration: KBB Starscream
*** Before I start, I forget to take pictures of the nosecone fix that I did, but basically if you have the problem of the nosecone not able to pus in properly, you might want to check the connector piece should have the screw head seen on top ***
As many of the KBB Starscream (yeap, I will call this figure Starscream and not Starburst) owners know, the back piece of the robot mode is much higher than the authentic MP-11 mold... So, I follow the path of the many and tried to restore the design back to a shorter back piece... First, the extra piece is cut off and later super-glued back to its original intended position behind the neck area...
This re-attached piece is also has the thickness sanded down to allow the head to go through more comfortably...
And also don't forget to sand down the sides of these 2 joints (and remember to sand the edges round) after re-attaching the piece... these will help the head to go through more easily...
And thus restored... Looks so much better...
This KO also tends to flip backwards, and I believe it is due to a gap located between the heel and the cover piece, so I layered small strips of ABS (about 0.2mm thick) on the heel to attempt to fill up the gap... It works... Though the 2 heels needs different amount of layers... weird...
These parts need to be be filed down when flipping in the heel to be stored in jet mode (note the afterburner id popped out, hence the ball joint seen)...
And Starscream can now stand much much better (though wearing the coronation cape will still cause it to be a little back-heavy, but already is so much more stable)...
And the different modes!!!! Nice...
*** Just For Fun ***
As many of the KBB Starscream (yeap, I will call this figure Starscream and not Starburst) owners know, the back piece of the robot mode is much higher than the authentic MP-11 mold... So, I follow the path of the many and tried to restore the design back to a shorter back piece... First, the extra piece is cut off and later super-glued back to its original intended position behind the neck area...
This re-attached piece is also has the thickness sanded down to allow the head to go through more comfortably...
And also don't forget to sand down the sides of these 2 joints (and remember to sand the edges round) after re-attaching the piece... these will help the head to go through more easily...
And thus restored... Looks so much better...
This KO also tends to flip backwards, and I believe it is due to a gap located between the heel and the cover piece, so I layered small strips of ABS (about 0.2mm thick) on the heel to attempt to fill up the gap... It works... Though the 2 heels needs different amount of layers... weird...
These parts need to be be filed down when flipping in the heel to be stored in jet mode (note the afterburner id popped out, hence the ball joint seen)...
And Starscream can now stand much much better (though wearing the coronation cape will still cause it to be a little back-heavy, but already is so much more stable)...
And the different modes!!!! Nice...
*** Just For Fun ***
Side-Tracked: Recent Haul of TFs (188) - Titans
Haul from Taobao finally came... and I learnt an important lesson : Never buy through ezBuy agent after October... they thought they can handle with all the promotions they throw out since the 10.10, but they are proven very wrong, either too short in manpower than anticipated, or their current SOP is not designed to handle such big flow, and the good old quality standard never came back even till now... sigh... Anyway, count myself lucky that I got most of the items ordered... Here goes (for tokusatsu items, visit my other blog Kamen Rider Fever ... For Now ):
First up, the Ku Bian Bao a.k.a. KBB a.k.a. 酷变宝 Starburst... But we all know who he really is: Starscream (the MP 11 version) !!!!!! hahahahaha... Super big box, which totally just waste more volumetric shipping and up the shipping fee... hahahahaha... Costs about SGD83.35 (I stupidly accidentally choose the Express Air shipping which costs way more)...
And the contents... sigh, accidentally topple the whole tray and is now missing 1 of the bullet for the null-ray rifle...
Not the best of KO, but surely this is unacceptable... deformed afterburner... hahahahaha... sigh... anyway, not really bothered as it is seldom being seen... The long list of nitpicks: (1) Long back piece in robot mode (2) Gap between heel and cover make the figure easily flip back (3) head too tight to slide in/out when transforming (4) Nosecone cannot push in fully... *** For Nitpick (4), it might be the connector piece fitted wrongly (screw head should be on top); and has fixed it but forget to take pictures... Will put up a separate post for the fixing...
Also gotten the TR Brainstorm!!! Cannot wait for my local TRU... hahahaha... Costs about SGD44.05 ...
And also a loose TR Sixshot... Costs about SGD63.65 ... The joints for the knees and hips-sideways are loose, and as usual, superglue technique is used to tighten them... Loose version did not have the stickers applied, which is a good thing...
First up, the Ku Bian Bao a.k.a. KBB a.k.a. 酷变宝 Starburst... But we all know who he really is: Starscream (the MP 11 version) !!!!!! hahahahaha... Super big box, which totally just waste more volumetric shipping and up the shipping fee... hahahahaha... Costs about SGD83.35 (I stupidly accidentally choose the Express Air shipping which costs way more)...
And the contents... sigh, accidentally topple the whole tray and is now missing 1 of the bullet for the null-ray rifle...
Not the best of KO, but surely this is unacceptable... deformed afterburner... hahahahaha... sigh... anyway, not really bothered as it is seldom being seen... The long list of nitpicks: (1) Long back piece in robot mode (2) Gap between heel and cover make the figure easily flip back (3) head too tight to slide in/out when transforming (4) Nosecone cannot push in fully... *** For Nitpick (4), it might be the connector piece fitted wrongly (screw head should be on top); and has fixed it but forget to take pictures... Will put up a separate post for the fixing...
Also gotten the TR Brainstorm!!! Cannot wait for my local TRU... hahahaha... Costs about SGD44.05 ...
And also a loose TR Sixshot... Costs about SGD63.65 ... The joints for the knees and hips-sideways are loose, and as usual, superglue technique is used to tighten them... Loose version did not have the stickers applied, which is a good thing...
Wednesday, December 14, 2016
Crotch Piece Modification : Titans Return Twinferno / Doublecross
Think this looks so much better than 1 single piece... Personal preference only... hahahaha...
First, gently pry off the crotch piece...
Then carefully cut out the 2 side pieces...
Make 2mm ( I think... ) hole for each of the 2 side pieces, and prepare 1 pin-peg stuff (not sure what it is called) that Tamiya model kits used... yah...
Cut 2 pieces of the pegs of about 5mm long each...
... and super-glued it into the 2 holes each... Touch up with some red paint at the cut-off sides, and when dried, re-attach the 2 side pieces back to the body, and hot-glue the central piece back... Done!!!!
Poses...
Subscribe to:
Posts (Atom)